
Topic: Green Screen Test
Watch it here:
http://www.youtube.com/watch?v=PDQVPEHuQ8w
Comment on both keying and animation.
Thanks
We are a friendly filmmaking community devoted to the art of stop-motion animation using LEGO® and similar construction toys. Here, you can share your work, join our community of other brickfilmers, and participate in periodic animation contests!
A place to discuss, share, and create stop motion films.

You are not logged in. Please login or register.
Watch it here:
http://www.youtube.com/watch?v=PDQVPEHuQ8w
Comment on both keying and animation.
Thanks

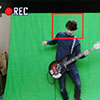
That actually keyed out a lot better than I was expecting. You need to do two things that I saw. First, secure your set... it was wiggling all over the place. Secondly, you need a bigger distance between your green screen and your subject. Green light is reflecting back onto your subject, which is creating a green haze around the edges.
That actually keyed out a lot better than I was expecting.
Yeah. First it keyed hands and head off too,
but then I did color correction and it keyed lot better.
You need a bigger distance between your green screen and your subject. Green light is reflecting back onto your subject, which is creating a green haze around the edges.
I need better materials for shore.
Anyways thanks for review.

I would suggest using a blue screen instead of green whenever possible. Blue isn't as close to yellow as green is and it keys better when using the minifigs. I did it in my 300 video and it worked way easier for me then green.
I agree with what Noodle said, keep workin' at it, it looked pretty good.

That was actually pretty good for a test. My signature was done with CineGobs (free), and the only reason it turned out so good was because I had an awesome color (tech green, it's used in professional movies), and I lit it evenly. Your's looked quite nice, but you might want to use a bit of spill supression.

there is a little reflection of the green screen on the brick, which software did you use?
I would suggest using a blue screen instead of green whenever possible.
Where should I get one?
I agree with what Noodle said, keep workin' at it, it looked pretty good.
Thanks
which software did you use?
Sony Vegas pro 7.0
That was actually pretty good for a test.
Thanks
I had an awesome color (tech green, it's used in professional movies), and I lit it evenly.
I had somekind of random green and I kind of used daylight (I know it's not good for brickfilming but...Yeah).
you might want to use a bit of spill supression.
Whats spill supression? (sorry but English is my second language)
Last edited by Legoluke654 (December 30, 2009 (09:07am))

The keying was pretty nice, but there was a lot of spill. By "spill" we mean that there is a green-ish glow on the minifigs (look at the edges of the minifig and especially the top edge of the red thingie - there is a lot of green). This is partly because LEGO is so reflective, but you can prevent it in 2 steps though it can be tricky.
First off, put your green screen as far back as you can; seperating the background from the foreground is an important step. Then, make sure you have a lot of lights, and light the green screen seperately. So you'd use 2 lamps to just light the green screen, and then 3 more to light just the minifig and his thing. This usually helps a LOT though with LEGO bricks you can't always get rid of spill completely.
Animation wise, it would be good to tape down camera and sets because the red thing was moving around a lot.
Hope to have helped you out here. Remember, practice makes perfect! ![]()
- BertL
The keying was pretty nice, but there was a lot of spill. By "spill" we mean that there is a green-ish glow on the minifigs (look at the edges of the minifig and especially the top edge of the red thingie - there is a lot of green). This is partly because LEGO is so reflective, but you can prevent it in 2 steps though it can be tricky.
First off, put your green screen as far back as you can; seperating the background from the foreground is an important step. Then, make sure you have a lot of lights, and light the green screen seperately. So you'd use 2 lamps to just light the green screen, and then 3 more to light just the minifig and his thing. This usually helps a LOT though with LEGO bricks you can't always get rid of spill completely.
Animation wise, it would be good to tape down camera and sets because the red thing was moving around a lot.
Hope to have helped you out here. Remember, practice makes perfect!
- BertL
Thanks for advice and I'll do it next time.
I agree with most of the guys here. It looks quite good, I had to practice ALOT to get it right, and sometimes it's still crap. Lego is very shiny, and very hard to key, but when your there, you can do suddenly alot more with sets.
Or in CineGobs there's an option that you can use to digitally remove the spill supression. Use that, plus BertL's tips, and you're good to go.
English is your second language?!?!?! Wow. You're better at it than most people who speak English as their first language here! ![]()
That's because most people here don't take the time to learn it properly (unlike me, the grammar freak.)
Except for the slight green around the figure and the base, it was very good. No missing body parts, no random specks of green. Pretty good, I'd say!
Posts [ 17 ]


