Topic: Beginning to animate
The purpose of this thread is to help the beginners to start animating and making stop-motion brickfilms.
The guide starts:
Stop-motion:
It is an animation style taking a series of pictures and putting them together so you can create movement (your hands will not be watched). Stop-motion has various requirements before starting animating.
Requirements:
Webcam/Camera/Camcorder:
All are acceptable as long as they can take picture while connected to the computer, for more detail there is a comparison in brickfilms.com for the cameras over here.
Software/Hardware:
For this I recommend checking out the free software list to select programs based on you operative system, if you want to buy then check the not free software list. The softwares you need are:
Capturing:
A program used to take a picture digitally and not moving the camera, it helps in all the focus options and like that. This is a tutorial on Monkey Jam made by Rsteenoven. Monkey Jam is a free capturing software for windows that is used a lot by animatiors. If you have a Mac I made a tutorial on istopmotion.
Editing:
Programs for editing, like putting the titles and all that.
Starting to animate:
To animate you take a picture, move the camera/minifig or whatever you are animating a little bit, then take another one, move the object again, take another one, and you repeat. Basic animation is a tutorial made by Nathan Wells to start animating, check his channel to watch 11 more tutorials. Ease in and out and running is a tutorial Fancypants made on what the link says, running is part of the walk cycle this is the basic walk tutorial that Nathan Wells made.
Advanced animation:
Advanced animation are animating techniques which require other methods than just a camera, there are many like white expanse that is made by Rsteenoven or running at the speed of light by NXTManiac. Camera movement by Fancypants is a important part at animating, this tutorial shows you how to make it. If you want to know more advanced animation, NXTManiac shows how to make a fireplace effect or breaking glass.
Set building:
What you want when building a set is that you see no carpet, wood, concrete, etc. seen, unless intentional.You need to build a wall in the border of a baseplate or something like that where your camera can fit. Then you make the camera focus on the set. Building what the camera sees, Size Matters, Structural Integrity, and and Aesthetics are tutorials on set building made by Nathan Wells
FPS:
FPS means frames per second, that means the amount of pictures that are needed to make 1 second. 15 FPS is that 15 pictures make 1 sec. The normal frame rate that brickfimers use is 15 FPS, but for beginners I recommend 12 fps or 10 minimum.
FPS matters is a tutorial in brickfilms.com for the FPS.
Audio:
You want to make your audio before making the film, you need to "match" the audio to the animation by making math. If you have 2 seconds of audio and you have 12 FPS then 24 pictures make 2 secs 24 pictures are needed for 2 secs of audio. This is a tutorial Fancypants made of recording voices in Audacity, a very useful audio program.
Lighting:
You need to find a dark place to brickfilm, no natural light, as the sun constantly changes the light changes. You can black out the windows or find a dark place. You then need 2 or more lamps to light, cover the lamps with paper to have an evenly distributed light. this is Fancypants tutorial for lighting. Over here, brickfilms.com also has some hints and again we go back to cameras in the brickfilms tutorial.
Special effects:
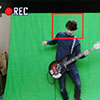
Special effects are not really needed to make a good brickfilm, but it is always handy to know. How to make a minifig fly is called masking and GIMP is a free software for that. Rsteenoven has a tutorial on making in GIMP. GIMP can also be used to make a gun effect, that is what this tutorial made by MooCJ teaches. You can also make in GIMP a lightsaber effect although it is better to have other programs. This tutorial made by cj64 teaches lightsaber effect in GIMP. Another effect that can be used is chroma key, Rsteenoven has a chroma key tutorial on Cinegobs Keyer. Cinegobs Keyer is windows only, for Mac imovie 09 has a chroma key effect on it.
If you have suggestions please inform
Last edited by Brick by Brick (March 27, 2010 (04:33pm))

Brick by Brick is the man